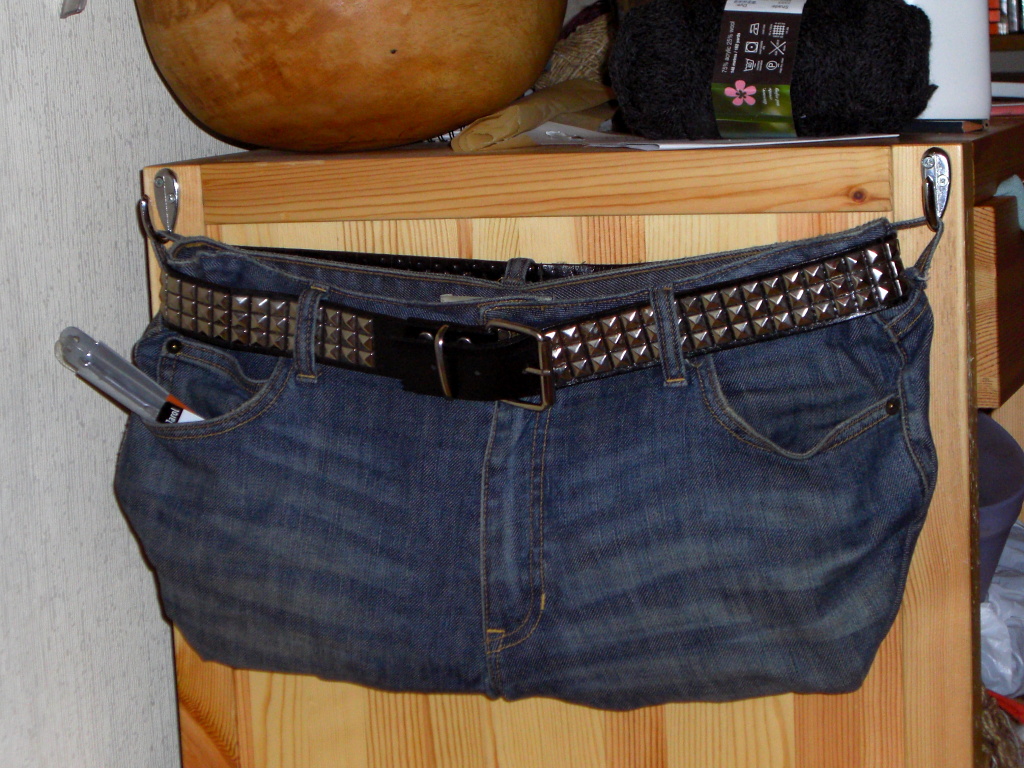
As my love of knitting and crochet has grown so has my collection of needles, hooks and other related accessories.
I decided I needed a needle bag to keep them all neat but despite digging the sewing machine out, didn’t fancy doing too much sewing. My first thought was to modify an old pillow case – I have a stash of vintage ones for crafting with courtesy of various charity shops – but then realised an old pair of jeans would be even better – lots of built-in pockets!
Vague instructions below but it’s dead simple. The belt is old cheap one that I worn too much and snapped the last 6 inches off the tip — too short for me now but a perfect (if largely unnecessary) accessory here.
I made it and took the photo a few weeks ago – the front pockets are now filled with crochet hooks in one side and short double pointed needles in the other. I’ve got stuff I don’t use much in the back pockets – picking shears in one side, cable needles and stuff in the other – with the main pocket stuffed full of regular needles and circular ones. It works pretty well and I can find everything I need – plus, it lifts of the hooks and is easily transportable too if I ever need to take my stuff anywhere (might add a detachable strap if that looks likely).
The bag hangs on the side of my “craft” unit in our living room – it’s relatively flat and looks comparitively neat compared to the rest of the crap bursting out of said unit/the rest of our house and is, reasonably, cat proof.
Vague instructions
(I’ve decided to start posting vague instructions/patterns on here even for stuff that’s super simple because I realise I get a lot of ideas/inspiration from people’s random patterns on their blogs etc so I thought I might as well join in the fun – hopefully my stuff will get more useful the more stuff I make.)
Equipment and materials
- An old pair of jeans, washed
- A zip or some poppers
- A belt (optional)
- Two (cup) hooks to hang it from (optional)
- Pins
- Sewing machine with cotton
- Needle and thread for zip/poppers
Vague How-to
- Turn your jeans inside out and lay them out on a flat surface.
- Pin the jeans together at the waist band – the cut of the jeans will probably determine how you do this. I tried to pin mine with the front and back of the waistband level but that made the cloth sit funny lower down so I went for a more natural position with the front slightly lower than the back.
- Decide how long you want your bag to be roughly. There was a giant rip at the bottom of the bum in mine so that kinda decided it for me. Draw a line at that height as a guide and throw a few pins in to stop the cloth shifting while you cut the legs off.
- Cut the legs off. (Do it a centimetre or so below your line. You’ll stitch your hem along the line.)
- Pin and hem along the line.
- I folded in/sewed the corners to make them more rounded because it looks a bit odd square.
- Turn the bag the right way around.
- Et voila. Pretty much.
- Some sort of fastening at the top stops it gaping open. I wanted to do a zip top but have some how managed to lose the 30cm zip I bought just a few weeks ago. So I used poppers/studs instead – just three, one in the middle and one on each side. They probably work better because I can delve in and dig around just unpopping one of them rather than having to undo the full zip.
- Add the belt if you want to add one. I found this bizarrely difficult for some reason and started at the back rather than the front, and had to put the entire buckle through all the loops. Don’t do this, it’s silly and awkward.
- If you’re hanging it from somewhere, work out how far apart your belt buckles are and screw in the hooks. Then hang it on the hooks.
- Et voila. Really.


Leave a Reply